[Apache] Redirection vers https

Exemple de redirection générale de http vers https avec Apache et mod_rewrite:

<VirtualHost *:80>
  RewriteEngine On
  RewriteCond %{SERVER_PORT} ^80$
  RewriteRule .* https://%{SERVER_NAME}%{REQUEST_URI} [R,L]
</VirtualHost>
<VirtualHost *:443>
  # Configuration!
</VirtualHost>

Cette manière de rediriger me semble particulièrement intéressante dans le cas où l’on a besoin de déployer simplement une configuration Apache valable pour différents environnements ayant des noms de domaine différents. On évite ainsi d’avoir à définir explicitement l’url vers laquelle on redirige avec :

RedirectPermanent / https://demo.monprojet.org/

Avec la redirection par réécriture d’url, nous allons pouvoir déployer indifféremment le même fichier de configuration Apache sur les machines de pré-production, démo et test par exemple.

Le seul point qui pourrait poser problème concerne le certificat. Soit nous disposons d’un certificat wildcard valable sur tous les sous-domaines et dans ce cas là, cela devrait rester relativement simple. Dans le cas contraire, nous pourrions envisager de stocker les fichiers de certificats au même endroit et avec le même nom sur chaque machine.

  SSLEngine On
  SSLCertificateKeyFile /path/to/projet.key
  SSLCertificateFile /path/to/projet-cert.pem

[Java] Parse json file

Back in may 2013, I was working on a school project concerning mobile networks. So this is what I wrote one year ago while I was fighting with handover algorithm and research papers.

I’m currently building a project to simulate handover decision process in GSM/UMTS. To be able to perform the simulation, I need some parameters like mobile gain, loss, coordinates as well as informations about antennas. I’ve chose to provide these parameters to the program using a json file. So I needed to find a way to get informations from the file and parse the json in java.

I used a JSON-Java library to initialized data. Here is the code needed to parse the json belove. The jsonStr variable contains our json file as a string.

JSONObject obj = new JSONObject(jsonStr);
JSONObject objMobile = obj.getJSONObject("mobile");
JSONArray arrayPath = objMobile.getJSONArray("path");

cro = obj.getDouble("cro");
rxLevAccMin = obj.getDouble("rxlevaccmin");
msTxPwrMaxCCH = obj.getDouble("msTxPwrMaxCCH");

//Initialize Mobile Station
for(int i = 0; i < arrayPath.length(); ++i) {
 JSONObject el = arrayPath.getJSONObject(i);
 journey.add(new Coordinate(el.getInt("x"), el.getInt("y")) );
}
mobileStation = new Mobile(objMobile.getDouble("gain"),
 objMobile.getDouble("loss"), objMobile.getDouble("classPower"),
 journey, objMobile.getBoolean("voice"), 6, -102, journey.get(0));

//Initialize Antennas
JSONArray arrayAntenna = obj.getJSONArray("antenna");
for(int j = 0; j < arrayAntenna.length(); ++j) {
 JSONObject el = arrayAntenna.getJSONObject(j);
 Coordinate position = new Coordinate(el.getInt("x"), el.getInt("y"));
 antennaList.add(new Antenna(el.getInt("type"), position, 
 el.getDouble("gain"), el.getDouble("loss"), el.getDouble("power"),
 el.getDouble("frequency"), el.getDouble("coef")));
}

Once our json string has been parsed to a json object, we can extract data using:

  • getJSONObject
  • getJSONArray
  • getBoolean
  • getInt
  • getDouble

Here is the json file:

{
  "rxlevaccmin": -96, 
  "cro": 0.0, 
  "msTxPwrMaxCCH": 33, 
  "mobile": { 
    "gain": 0, "loss": 0, 
    "classPower": 33, 
    "voice": false, 
    "path": [ 
      {"x": 11, "y": 0}, 
      {"x": 14, "y": 0}, 
      {"x": 16, "y": 0}, 
      {"x": 18, "y": 0}, 
      {"x": 20, "y": 0}, 
      {"x": 24, "y": 0}, 
      {"x": 25, "y": 0}, 
      {"x": 26, "y": 0} 
    ] 
  },
  "antenna": [ 
    { 
      "type": 0, 
      "x": 0, "y": 0, 
      "power": 20, 
      "gain": 0, "loss": 0, 
      "frequency": 900, 
      "coef": 1 
    }, 
    { 
      "type": 1, 
      "x": 30, "y": 0, 
      "power": 10, 
      "gain": 0, "loss": 0, 
      "frequency": 900, 
      "coef": 1 
    }, 
    {
      "type": 0, 
      "x": 20, "y": 5, 
      "power": 12, 
      "gain": 0, "loss": 0, 
      "frequency": 900, 
      "coef": 1 
    }
  ]
}

It’s funny to compare this with the one-line-way to parse json in Node.Js:

var jsonObject = require('jsonFileName');
var classPower =jsonObject.mobile.classPower

Organiser un Code Camp

En décembre 2013, j’ai eu l’occasion de m’occuper de l’organisation d’un Code Camp, petit retour d’expérience.

Pour celles et ceux qui n’auraient aucune idée de ce qui se cache dernière l’appellation « Code Camp », il est temps de donner quelques précisions. Un Code Camp, c’est une nuit entière pour écrire du code et faire avancer ses projets. Dans mon cas, celui-ci n’était pas seulement destiné aux informaticiens, mais à tous les étudiants désireux de travailler sur leurs projets. Ce moment permet souvent à un groupe de projet de se réunir au complet et d’être productif (au moins jusqu’à 2h du matin).

Au niveau du matériel nécessaire, il faut pour faire un bon Code Camp:

  • de l’électricité
  • des multiprises
  • un accès réseau
  • du café
  • des tables et des chaises
  • des participants
  • des pizzas

J’ai eu la chance de pouvoir emprunter une grande partie du matériel à l’école et à l’association des étudiants. Quelques points à bien vérifier avant: la taille des tables pour bien estimer le nombre nécessaire; que le courant a bien été activé dans les prises comme promis. C’est deux points permettent déjà d’éviter de mauvaises surprises. Un accès réseau est également incontournable pour permettre à tous d’accéder aux documentations en ligne.

Prévoir un percolateur pour pouvoir faire du café en quantité. Une commande de pizza est faite en début de soirée, néanmoins, le temps de préparation et de livraison est toujours extrêmement long (une cinquantaine de pizzas à faire tout de même). De ce côté là, je pense qu’il serait bon d’organiser une pré-commande quelques jours avant. Cela permettrait à la pizzeria de mieux se préparer et aux participants d’être servi plus tôt.

Il faut également avoir une petite équipe de personne pour aider à installer avant le début de l’événement, puis à désinstaller le lendemain matin.

Pour finir, organiser un Code Camp n’est pas spécialement difficile, en revanche en tant qu’organisateur, il ne faut pas espérer travailler sur son projet avant que les pizzas soient arrivées.

Installing Cabot on Debian

Let’s say we want to install Cabot on a server, but not on AWS, nor on DigitalOcean. And because we like challenges, let’s just use Debian Wheezy 7.5 instead of the recommended Ubuntu 12.04 LTS. Ready?

We will try to follow Cabot quickstart to perform the installation.
But first, we must set up a few things. I’ve discovered that during installation, Cabot locks the password of the root account using passwd -l root. So be aware that you won’t be able to log with root and ssh if you haven’t set an authentication process using SSH keys. As The Hitchhiker’s Guide to the Galaxy would say: « Don’t Panic », you can reverse the process if you want using passwd -u root. As a security, you could always create another user with adduser mynewuser and give him an admin status by adding it to the suddoers file with visudo.

So let’s create our keys and configure ssh.
Generate the key:

ssh-keygen -t rsa

Now that we have a key named id_rsa.pub in our .ssh directory, we should do the following steps:

  1. Generate the key-file.
  2. Somehow get the key-file over to the right user-id on the right host.
  3. If that user doesn’t already have an « .ssh » directory, create one AND set its permissions to « 700. » (« rwx——« )
  4. If that user doesn’t already have an « .ssh/authorized_keys » file, create one AND set its permissions to « 600. » (« rw——-« )
  5. Append … don’t overwrite(!) … the new key to that file.

Or we can use ssh-copy-id:

 ssh-copy-id -i ~/.ssh/id_rsa.pub root@hostname.org

You should now be able to log in without having to type in a password.

Before going further, we need to install Fabric as it is used to provision the server and deploy Cabot.

pip install fabric

Fabric also requires some dependencies which are described on Fabric installation page.

Next step, clone the repository. I am using the deploy branch of lincolnloop fork which include awesome python packaging.

 git clone https://github.com/lincolnloop/cabot.git
 git checkout deploy
 cd cabot

Modify configuration: (might need to use development.env with the fork here)

 cp conf/production.env.example conf/production.env
 vim conf/production.env

Before doing anything, make sure you can or can’t install nodejs: aptitude search node. If nodejs can’t be found, you’ll need to install it manually.
A few changes before provisioning our server. Edit file bin/setup_dependencies.sh
and remove line 57 and 58:   ‘nodejs‘ and ‘npm’
Install nodejs manually, npm should come it.

fab provision -H root@your.server.hostname

Once it’s done, we can deploy cabot:

 fab deploy -H ubuntu@your.server.hostname

You should get an error because cabot is trying to use upstart but can’t find it.
To run Cabot, log in to your server under the user ubuntu.

 cd 2014-06-19-e662635

(Your directory will have a different name following a similar pattern year-month-day-wathever)

 foreman start

Congratulations, Cabot should now be running!

Cabot

Things to do

I will certainly add a simple init.d script to my Cabot fork so that we can run it easily. I will maybe change one or more things as the ubuntu username.

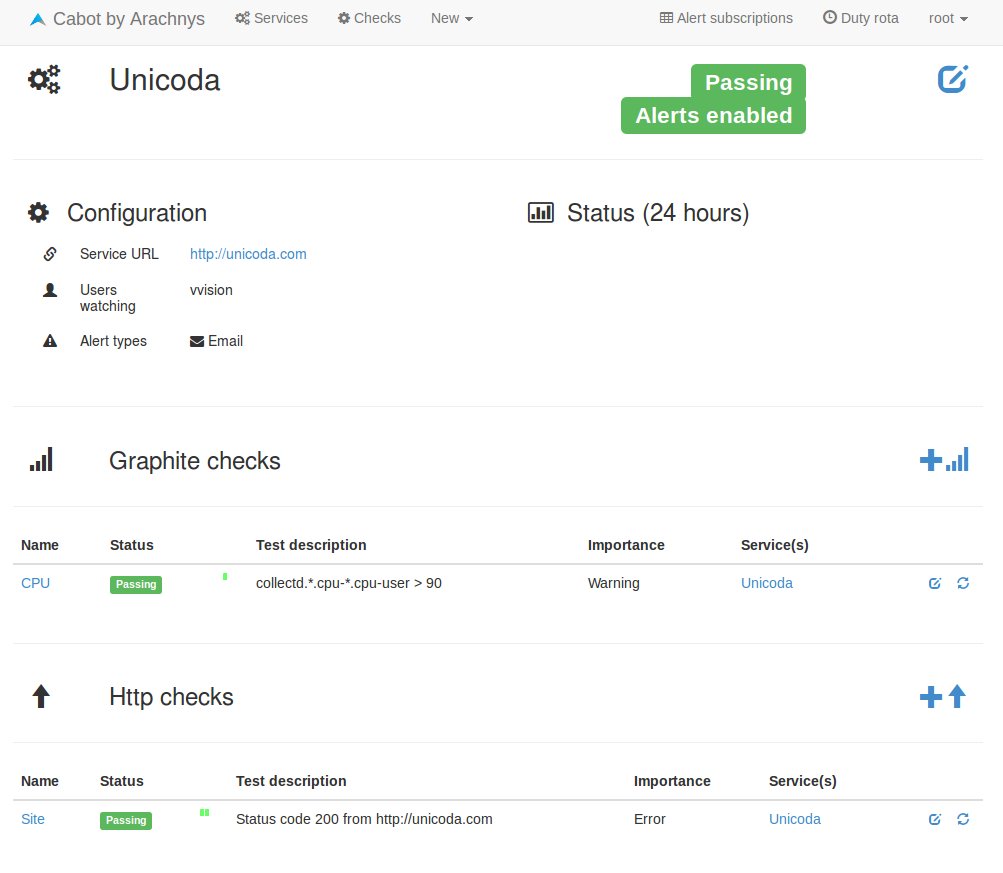
Understanding how to install and run Cabot took me a few hours. I got disturbed by the quickstart speaking of AWS or DigitalOcean server. I also tried to install it manually but didn’t manage to get it work, although I was close to it (I think. Or at least I hope ^^). Installing it on Debian added some difficulties, but nothing insurmountable. As a conclusion, I must say that Cabot is worth the effort. It provides a great way to monitor your service with Http checks and the possibility to alert based on Graphite metrics is just priceless.

Magical Graphite

Or, « What I’ve learned about Graphite configuration ».

Last week, I worked on configuring Graphite and had to understand how it stores and aggregates data. So here are a few facts.

Graphite Retention

The way our data will be stored is described in /opt/graphite/conf/storage-schemas.conf. As an example:

[default]
 pattern = .*
 retentions = 1s:30m,1m:1d,5m:2y

This worked great when I was looking at data from the last 30 minutes.
If I was trying to display last hour metrics: nothing.
Drawing null as zero was giving me a horizontal line at the bottom of the graph.

The magic of aggregation

This behaviour comes from the file /opt/graphite/conf/storage-aggregation.conf where we find the following lines:

[99_default_avg]
 pattern = .*
 xFilesFactor = 0.5
 aggregationMethod = average

Our problem comes from xFilesFactor. It means that by default, we need at least 50% of the data to be non-null to store an average value. Think about it.

So here, I’m having a metric every second during 30 minutes. If Graphite doesn’t have something for a given second, the value is set to null. Fine, let’s move forward.
For interval higher than 30 minutes (and lower than a day), Graphite will gather data based on the aggregation configured. So it will average data and set the value null if it has less than 50% usable values (not null).

In our case, Graphite tries to average one minute of data (1m:1d) with the precision of 1s from the first retention rule (1s:30m). To understand why nothing is displayed, consider I’m Collectd is sending data to Graphite. On average, metrics are arriving every 3s. On a one minute interval, we gather 20 values but Graphite is considering 60 values, 40 being null. We only have 33% (0.33) metrics usable which is lower than 50% Graphite is waiting for so the averaged value is set to null.

The art of confusion

Now that we updated our configuration, set xFilesFactor to 0 to be sure, restart carbon-cache, everything should work fine…

But that’s not the case; no change.

In fact, previous configuration is still being used in wsp storage files. We can check it with whisper-info.py.

whisper-info.py /opt/graphite/storage/whisper/collectd/test-java01/cpu-0/cpu-user.wsp
 
 maxRetention: 63072000
 xFilesFactor: 0.5
 aggregationMethod: average
 fileSize: 2561812

Archive 0
 retention: 1800
 secondsPerPoint: 1
 points: 1800
 size: 21600
 offset: 52
Archive 1
 retention: 86400
 secondsPerPoint: 60
 points: 1440
 size: 17280
 offset: 21652
Archive 2
 retention: 63072000
 secondsPerPoint: 300
 points: 210240
 size: 2522880
 offset: 38932

See, we still have xFilesFactor: 0.5.
If you don’t care about previous data, a good solution is to delete files so that the new parameters will be used (rm -rf /opt/graphite/storage/whisper/collectd/). Maybe it’s a little bit overkill, (but easy and fast).

The other solution consists in using whisper-resize.py to enforce the new configuration.
whisper-resize.py /opt/graphite/storage/whisper/collectd/test-java01/cpu-0/cpu-user.wsp 3s:30m,1m:1d,5m:2y –xFilesFactor=0.1

The above works fine, but this is the other way to configure how many metrics Graphite can keep. It has the format n:i, which means we store a measure every n seconds and we want i points to be stored (computed with interval / n).

Example: 3s:30m
30m = 1800s
1800 / 3 = 600

3:600

So 3s:30m,1m:1d,5m:2y gives us 3:600 60:1440 300:210380.

« An average Gregorian year is 365.2425 days = 52.1775 weeks = 8765.82 hours = 525949.2 minutes = 31556952 seconds (mean solar, not SI). » Wikipedia

Note

Thing to remember concerning storage-schemas.conf (taken from Graphite doc):

« Changing this file will not affect already-created .wsp files. Use whisper-resize.py to change those. »